Dynamic figure drawing depends on more than accurate anatomy. I look for poses that show movement, balance, tension, and intention so each body feels connected to an action rather than arranged in place.
You can make figures feel alive by studying how weight, gesture, and the line of action shape every pose. The ideas ahead explore varied stances, movements, and gestures while helping you turn references into original figure studies.
Table of Contents
- 1 1) Contrapposto stance with one hip relaxed
- 2 2) Figure leaning into a strong diagonal
- 3 3) Walking figure captured mid-stride
- 4 4) Twisting torso with opposing shoulders and hips
- 5 5) Seated figure reaching toward the floor
- 6 6) Dancer extending one leg and both arms
- 7 7) Runner leaning forward before acceleration
- 8 8) Figure stretching with arms overhead
- 9 9) Person turning back over one shoulder
- 10 10) Crouched figure shifting weight onto one foot
- 11 11) Jumping figure with flowing clothing
- 12 12) Standing figure resting against a wall
- 13 13) Figure balancing on one leg
- 14 14) Seated figure leaning forward thoughtfully
- 15 15) Person lifting a heavy object
- 16 16) Figure curled into a compact resting pose
- 17 17) Swimmer diving with an arched back
- 18 18) Figure climbing with extended limbs
- 19 19) Person reaching toward an unseen object
- 20 20) Falling figure with trailing limbs
- 21 21) Figure shielding the face from light
- 22 22) Dancer caught during a spin
- 23 Principles of Gesture, Balance, and Line of Action
- 24 Using Weight Distribution to Create Believable Stances
- 25 Choosing Clear Silhouettes and Negative Space
- 26 Turning Reference Into Original Figure Studies
- 27 Observing Anatomy Without Overrendering
- 28 Varying Camera Angle, Cropping, and Perspective
1) Contrapposto stance with one hip relaxed
I place the figure’s weight on one leg and let the opposite hip rise slightly. This shift creates a natural asymmetry through the pelvis, spine, shoulders, and head, giving me a clear structure to observe rather than a rigid vertical pose.
I keep the supporting leg relatively straight while allowing the relaxed leg to bend, turn, or rest lightly on the ground. I then angle the shoulders against the hips instead of copying the same tilt at both levels.
I use the rib cage and pelvis as separate masses, checking their direction before adding limbs or clothing. Small adjustments to the hands, neck, and gaze can reinforce the relaxed balance without making the pose feel staged.
2) Figure leaning into a strong diagonal
I place the head, rib cage, and hips along a clear slant, then let the limbs respond to that direction. This arrangement gives me an immediate sense of movement without requiring a complex action.
I keep the supporting foot firmly planted and shift the pelvis away from the torso’s angle. The counterbalance helps the pose feel physically stable, while the extended leg or arm can carry the diagonal farther through the composition.
I use the spine as my main guide and check the shoulder and hip lines against it. Small changes in these angles can make the figure look relaxed, tense, or close to losing balance.
3) Walking figure captured mid-stride

I begin by placing the figure’s weight on one leg and extending the opposite leg forward or backward. The hips and shoulders counter-rotate, while the arms swing naturally in opposition to the legs.
I keep the torso slightly inclined in the direction of travel rather than making it perfectly upright. A small lift in the heel, a bent supporting knee, or a trailing foot helps me show movement without distorting the figure’s anatomy.
I use overlapping contours where the limbs pass in front of the body, then vary the line direction to clarify depth. Before adding clothing or details, I check that the head, rib cage, pelvis, and feet follow a believable path through space.
4) Twisting torso with opposing shoulders and hips
I place the rib cage and pelvis on slightly different axes, then connect them with a curved waistline. One shoulder rises as the opposite hip lifts, creating a clear counter-rotation through the torso.
I keep the twist structural rather than forcing every contour into a curve. The spine, sternum, and navel help me track the rotation, while the shoulders and hips establish opposing angles. I let the limbs respond to that shift: one arm may hang freely as the other bends, and the legs may counterbalance the upper body.
I check the pose by comparing the shoulder line, hip line, and weight-bearing leg. Small changes in those relationships can make the figure feel relaxed, braced, or in motion.
5) Seated figure reaching toward the floor
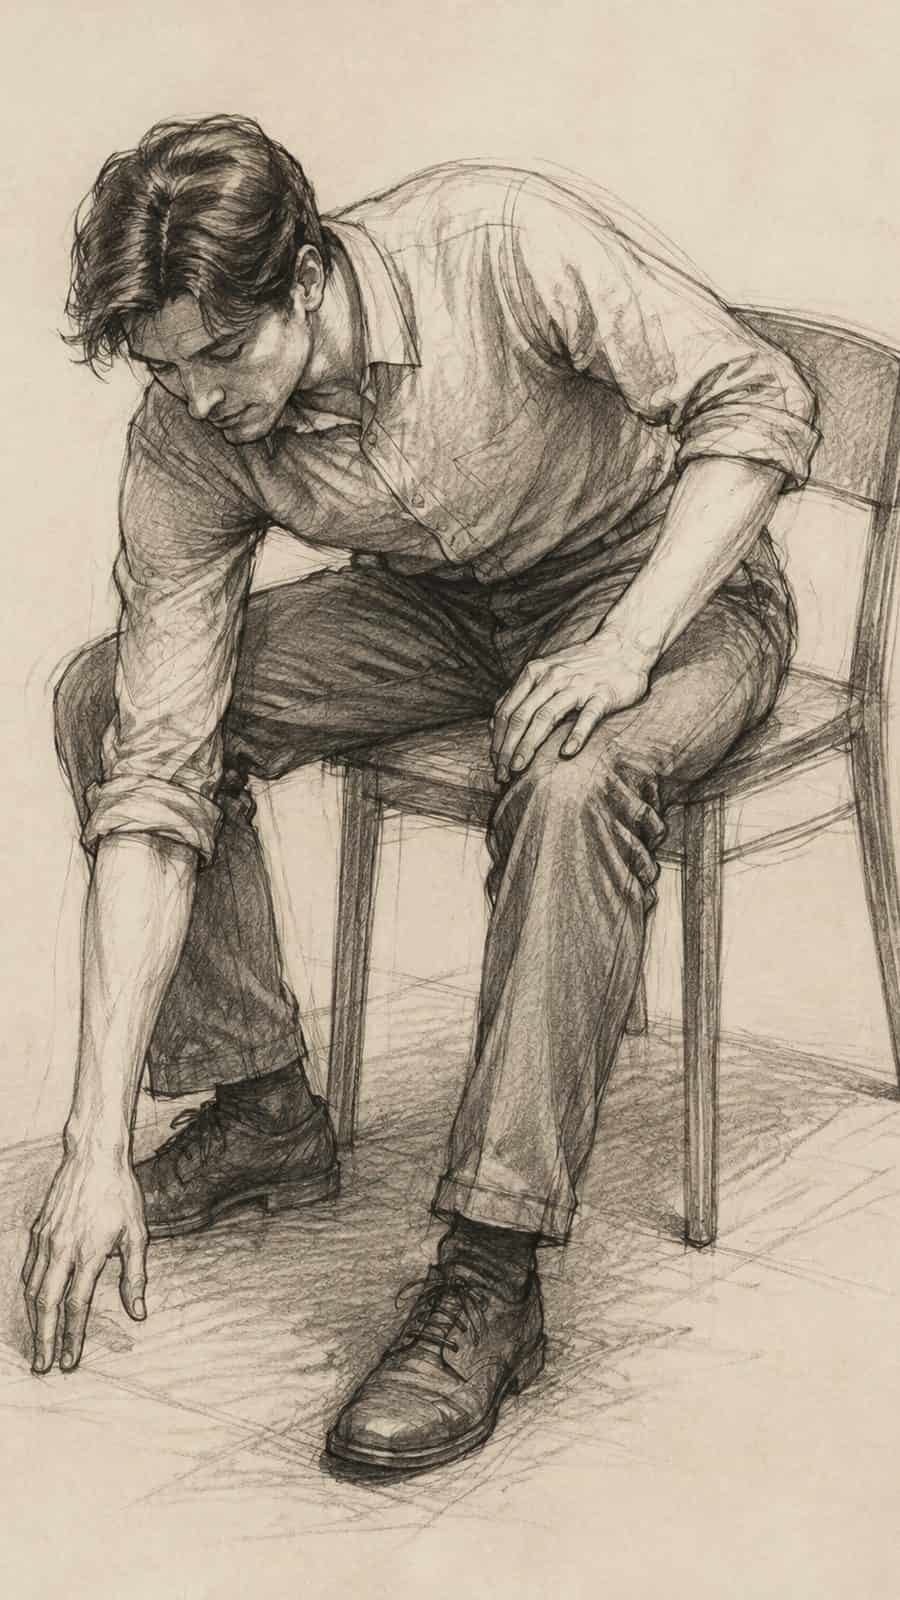
I start with the seated figure’s weight anchored through the pelvis, then angle the spine forward toward the reaching hand. The shoulder on that side drops slightly, while the opposite shoulder stays higher to maintain balance.
I place the supporting hand or forearm near the floor to clarify the pose’s stability. I keep the reaching arm elongated but avoid making it perfectly straight; a small bend at the elbow adds natural tension.
I use the knees and feet to direct the pose toward the reaching action. Overlapping the thigh, shin, and arm helps show depth, while the head follows the spine rather than turning independently without purpose.
6) Dancer extending one leg and both arms

I start with the supporting leg and build the pose upward, keeping the knee slightly relaxed rather than locked. The extended leg should lengthen from the hip, while the pelvis tilts subtly to maintain balance.
I place both arms on different angles instead of making them perfectly symmetrical. One arm can reach forward and the other outward, creating a clear directional flow through the shoulders, torso, and hands.
I keep the rib cage lifted but avoid arching the lower back too far. A slight turn of the head toward the raised arms adds focus, while small bends in the fingers and ankle make the figure feel active rather than stiff.
7) Runner leaning forward before acceleration

I draw the torso tilted forward from the ankles rather than bending at the waist. This keeps the pose balanced and suggests controlled readiness. I place the head slightly ahead of the shoulders, with the gaze directed toward the path.
I keep one leg planted beneath the body and bend the other, lifting the heel or setting the foot lightly behind. The arms oppose the legs: the forward arm bends across the body while the opposite elbow moves back. I use sharper angles in the limbs to contrast with the long forward line of the torso.
8) Figure stretching with arms overhead

I start with a lifted rib cage and both arms reaching above the head, then let the spine curve gently instead of keeping it rigid. This pose works best when I offset the hips slightly, creating a natural stretch through the torso and shoulders.
I keep the feet grounded while varying the weight between the legs. One heel can rise, or one knee can soften, which prevents the stance from feeling symmetrical and static.
I also watch the spaces between the arms, head, torso, and legs. These negative shapes help me check the figure’s balance while the extended arms guide the viewer’s eye upward.
9) Person turning back over one shoulder

I start with the twist through the torso, placing the rib cage and pelvis at slightly different angles. The turning shoulder moves back while the opposite shoulder shifts forward, creating a clear change in depth.
I keep the head aligned with the turn but let the face look toward the viewer or past them. This small difference prevents the pose from feeling stiff and gives the neck a natural curve.
I use the nearer shoulder, cheek, and hand as overlapping shapes, then place the far arm or hip behind them. A slight shift in weight, such as one knee relaxing, helps the figure feel balanced rather than posed mechanically.
10) Crouched figure shifting weight onto one foot
I start by placing the pelvis low and shifting it toward the supporting foot. The planted foot carries most of the weight, so I keep that knee bent and align it roughly beneath the hip. The opposite foot touches lightly or lifts at the heel, showing reduced pressure.
I angle the torso slightly away from the supporting leg to counterbalance the pose. The shoulders do not need to match the pelvis; I often tilt them in the opposite direction to create a natural weight shift. Let the head follow the torso rather than sitting perfectly upright.
I use the arms to reinforce the crouch. One hand may reach toward the floor or rest near the knee, while the other hangs loosely or extends for balance. I keep the compressed side of the body shorter and the stretched side longer, which helps the figure feel grounded and active.
11) Jumping figure with flowing clothing

I start with the body at its highest point, using a clear upward arc through the spine and raised limbs. I keep the torso slightly twisted so the pose feels active rather than suspended. One knee can bend toward the body while the other leg extends downward or outward.
I draw the clothing as a delayed response to the jump. Loose fabric, sleeves, hair, and straps should trail behind the movement, with folds widening where air catches them. I vary their directions instead of repeating the body’s outline.
I place the strongest lines along the lifted limbs and the largest fabric shapes. Then I add smaller folds near joints and seams to show how the clothing connects to the moving figure.
12) Standing figure resting against a wall

I place the figure with one shoulder, back, or hip contacting the wall, then let the support shape the posture. The contact point carries some weight, so the opposite leg can bend or extend with less tension. I keep the head slightly independent from the wall to avoid a stiff, symmetrical pose.
I look for a subtle curve through the spine rather than a straight vertical line. The relaxed arm may hang, cross the body, or rest against the wall, while the supporting foot usually sits closer to the body’s center of mass. I use the wall as a reference, not as a substitute for observing balance.
13) Figure balancing on one leg

I begin by placing the supporting foot firmly beneath the hips, then tilt the pelvis slightly to show how the body distributes weight. The lifted leg can bend at the knee or extend outward, but its position should clearly oppose the torso’s movement.
I keep the standing knee subtly relaxed rather than locked. The spine, shoulders, and arms create small counter-movements that help the pose feel stable without becoming rigid.
I check the alignment from the grounded foot through the hip and rib cage. A gentle shift in the head or an uneven shoulder line adds individuality while preserving the figure’s balance.
14) Seated figure leaning forward thoughtfully

I begin with the pelvis grounded on the seat and tilt the torso forward from the hips, keeping the spine gently curved rather than rigid. I place the elbows near the knees or let one forearm rest across a thigh to create a believable sense of weight and balance.
I lower the head slightly and angle the gaze toward the floor or an unseen point ahead. Small asymmetries make the pose feel observed: one shoulder can sit higher, one hand can hang loosely, and the feet can point in slightly different directions.
I keep the back, neck, and arms connected through clear overlapping lines. This helps me show quiet concentration without relying on exaggerated facial expression.
15) Person lifting a heavy object

I show the effort through a lowered center of gravity, bent knees, and a stable stance. I keep the feet apart and place them firmly on the ground, while the hips and shoulders counterbalance the load.
I angle the torso forward without collapsing the spine. The arms should connect clearly from the shoulders to the object, with tightened elbows, flexed wrists, and hands gripping its edges or handles.
I add strain through compressed clothing, raised shoulders, and a focused head position. I avoid bending every joint equally; varied angles make the pose feel more natural and show how the figure distributes weight.
16) Figure curled into a compact resting pose

I start by placing the torso in a rounded shape, then fold the legs toward it to create a clear sense of compression. I keep the head slightly lowered or tucked near the knees, which helps connect the major forms.
I look for the weight-bearing points: the hip, shoulder, and outer forearm or hand. These contact areas anchor the pose and prevent the figure from appearing to float. I use overlapping limbs rather than outlining every form separately.
I vary the curve of the spine and adjust the hands, feet, or face to suggest the figure’s mood without forcing an expression. Small gaps between the limbs can clarify the pose while preserving its compact structure.
17) Swimmer diving with an arched back

I draw the body as a long, controlled curve, beginning at the fingertips and continuing through the shoulders, spine, hips, and extended legs. The arched back should feel intentional rather than rigid, with the chest opening as the pelvis follows the movement.
I keep the head aligned with the arms or slightly lifted, depending on the dive’s direction. Bent knees, pointed toes, and separated fingers add small changes in tension that make the pose feel observed instead of assembled.
I use overlapping forms to show the arms leading the motion and the torso following behind. A slight twist through the waist can suggest rotation, while uneven leg angles prevent the silhouette from becoming too symmetrical.
18) Figure climbing with extended limbs

I draw the torso angled toward the climbing surface, then extend one arm and the opposite leg to create a clear diagonal through the figure. This arrangement spreads the weight across the pose and prevents the body from appearing upright or static.
I keep the supporting hand and foot close to the surface while allowing the reaching limbs to stretch farther. I also bend the elbows, knees, and wrists slightly, since small changes in joint direction make the action feel more physically convincing.
I use the pelvis and shoulders as opposing anchors. A slight twist between them suggests effort, while the head turns toward the next handhold to give the pose a specific goal.
19) Person reaching toward an unseen object

I start by extending the torso slightly toward the implied object, then angle the hips back to create a counterbalance. This push-and-pull keeps the figure from looking stiff, even when the object remains outside the frame.
I place the reaching shoulder higher than the opposite one and let the arm lead the viewer’s eye. I keep the fingers relaxed but directional, with the palm and fingertips indicating the object’s position.
I also adjust the head and gaze to support the action. A forward-tilted head suggests focus, while a slight turn away can imply hesitation or uncertainty. The supporting leg carries most of the weight, and the free heel may lift to reinforce the figure’s forward intent.
20) Falling figure with trailing limbs

I draw the torso on a diagonal and let the head follow its momentum rather than keeping it upright. I place the hips slightly higher or lower than the shoulders, depending on the direction of the fall, then extend the limbs behind the body to show delayed movement.
I keep the hands and feet loose, with relaxed fingers and uneven spacing between the limbs. Bent joints help me avoid a stiff, airborne pose, while a few folds in the clothing reinforce the figure’s changing position.
I use a simple ground reference or implied motion path to clarify the fall. The face can turn toward the viewer, the ground, or away from the direction of travel, giving the pose a distinct emotional focus without changing its basic structure.
21) Figure shielding the face from light

I draw one arm raised across the forehead, with the elbow angled outward and the hand partly covering the eyes. This gesture creates an immediate focal point while leaving enough of the face visible to suggest expression. I keep the wrist relaxed and the fingers slightly separated rather than drawing a stiff block.
I tilt the head away from the implied light source and let the neck extend naturally beneath the raised arm. The shoulder on that side lifts slightly, while the opposite shoulder drops to keep the pose balanced. I use the torso’s gentle turn to prevent the figure from appearing flat.
I place the weight on one leg and bend the other to support the shielding gesture. Small shifts in the hips, elbow, and head give the pose a believable sense of reaction.
22) Dancer caught during a spin

I begin with the torso leaning slightly away from the turn, then place the hips and shoulders on different angles. This opposing movement gives the figure direction without making the pose rigid. I keep the supporting leg clear and let the free leg trail behind the rotation.
I use the arms to describe the spin’s path, extending one outward while allowing the other to bend closer to the body. The hands and feet should remain loose rather than perfectly posed. I also draw the costume, hair, or fabric following a delayed arc to show motion without adding unnecessary detail.
Principles of Gesture, Balance, and Line of Action
I build lively figure drawings by tracking the body’s main directional flow, the placement of its weight, and the shapes created around it. These choices help me make poses readable, stable, and expressive before I add anatomical detail.
Using Weight Distribution to Create Believable Stances
I first identify the leg that carries most of the body’s weight. In a standing pose, I place the pelvis slightly over that supporting foot and let the opposite hip rise or drop according to the leg’s position. This shift creates a natural counterbalance through the spine, shoulders, and head.
The line of action should connect the pose’s strongest movement, such as a curve running from the raised arm through the torso into the grounded leg. I avoid placing every joint along one straight axis because rigid alignment makes the figure look posed rather than active.
I also check the center of gravity. If I draw a vertical line from the torso’s center, it should fall near the supporting foot; otherwise, I show a step, lean, or other action that explains the imbalance.
Choosing Clear Silhouettes and Negative Space
I test the pose as a solid silhouette before drawing internal details. The outline should separate the head, arms, legs, and torso clearly enough that I can identify the action without relying on muscles or clothing.
I look closely at the negative spaces between limbs. A narrow triangular gap beneath a bent arm, a visible opening between the legs, or a clear space beside the torso can make the gesture easier to read. When these shapes disappear, I slightly adjust the limb angle or overlap.
I vary the contour with purposeful changes in direction. A straight forearm beside a curved torso, or a bent knee interrupting a long leg shape, gives the figure structure and prevents the silhouette from becoming an indistinct mass.
Turning Reference Into Original Figure Studies
I use reference images to understand structure, balance, and movement, then make deliberate changes to create a distinct study. I focus on essential anatomical landmarks while testing viewpoint, cropping, and perspective to keep each drawing personal and visually clear.
Observing Anatomy Without Overrendering
I begin with the rib cage, pelvis, spine, and major joints rather than individual muscles. These landmarks show how the figure twists, leans, or transfers weight. I mark the shoulder line, hip line, knees, and ankles with simple directional strokes before adding the outer contour.
I avoid copying every visible detail. Instead, I ask which forms explain the pose: the stretch across the abdomen, the compression at the waist, or the overlap between the forearm and torso. Large shapes come first; surface anatomy supports them.
When I simplify a reference, I preserve asymmetry. One shoulder may sit higher, one knee may turn inward, or one side of the torso may appear shorter because of perspective. I can then change the hairstyle, clothing, proportions, or gesture without losing the pose’s physical logic.
Varying Camera Angle, Cropping, and Perspective
I test the same pose from several viewpoints before committing to a finished study. A low angle enlarges the feet and underside of the torso, while a high angle compresses the legs and emphasizes the shoulders. I use overlapping forms and size changes to make depth readable.
Cropping can create a stronger composition without changing the gesture. I might cut through a forearm, head, or lower leg, but I place the crop away from important joints when I want the figure to feel complete. When I want tension, I let the crop interrupt the movement.
I also vary the horizon line and the amount of foreshortening. A box around the rib cage and pelvis helps me rotate the figure consistently, while simple cylinders clarify limbs pointing toward or away from me. These adjustments turn one reference into several original studies.