

Long hair gives you room to explore styles that feel polished, relaxed, or creatively detailed without relying on a basic ponytail. I’ll guide you through looks that use braids, twists, buns, waves, and simple accessories to help you refresh your routine.

Save for later
Want to come back to this story? Save it with your email so it is easy to find again.
You can find a long-hair style that suits your texture, occasion, and preferred level of effort. I’ll also cover practical ways to choose flattering styles and the essentials that make styling easier, so you can approach each look with more confidence.
Table of Contents
- 1 1) Textured Low Chignon
- 2 2) Half-Up Twisted Crown
- 3 3) Waterfall Braid
- 4 4) Fishtail Braid
- 5 5) Dutch Crown Braid
- 6 6) French Twist
- 7 7) Rope Braid Ponytail
- 8 8) Bubble Braid
- 9 9) Boho Braided Updo
- 10 10) Long Hair Top Knot
- 11 11) Half-Up Space Buns
- 12 12) Sleek Low Bun
- 13 13) Four-Strand Braid
- 14 14) Pull-Through Braid
- 15 15) Milkmaid Braids
- 16 16) Twisted Half-Updo
- 17 17) Cascading Curls
- 18 18) Hollywood Waves
- 19 19) Beachy Waves with Braided Detail
- 20 20) Voluminous Blowout
- 21 21) Claw-Clip French Twist
- 22 22) Scarf-Wrapped Bun
- 23 23) Braided Headband Hairstyle
- 24 24) Double Dutch Braids
1) Textured Low Chignon

I create this low chignon by adding loose waves or dry texture spray before gathering my hair at the nape. I twist the length into a relaxed knot, secure it with pins, and leave a few face-framing pieces loose for softness.
This style works best when I keep the texture visible rather than brushing it smooth. I gently loosen the crown and tug the bun’s edges to build shape while keeping the finish controlled. A few discreet pins help hold heavier long hair in place.
2) Half-Up Twisted Crown

I create this style by taking two sections from the front, twisting them away from my face, and securing them at the back with pins. The remaining hair stays loose, allowing its length and natural texture to show.
I prefer slightly textured hair because the twists hold their shape more securely. For a polished finish, I smooth the crown before pinning; for a softer look, I gently loosen each twist and leave a few face-framing strands free.
3) Waterfall Braid

I create this style by braiding a section from one side of my head and letting selected strands fall through the braid as I work toward the opposite side. The cascading pieces keep my long hair visible while adding structure around the face.
I secure the braid with a small clear elastic or a discreet pin behind my ear. For a polished finish, I smooth the loose lengths with a brush and lightly curl the ends; for a relaxed look, I gently loosen the braid and leave a few face-framing strands free.
4) Fishtail Braid

I create a fishtail braid by dividing my long hair into two sections, then crossing small pieces from the outer edge of one section over to the other. The pattern looks detailed but uses a simple technique, making it a polished alternative to a standard braid.
I keep the braid loose for a relaxed texture or pull the woven sections gently apart for added width. For a cleaner finish, I smooth flyaways with a small amount of styling cream and secure the end with a clear elastic. A side placement gives the style a softer, more casual shape.
5) Dutch Crown Braid

I create this style by Dutch-braiding each side of my hair from the front hairline toward the back. I cross the outer strands under the middle strand, adding small sections as I move, then secure both braids near the opposite side.
I pin the braids around my head to form a crown, leaving the lengths loose or tucking the ends underneath. I prefer gently pulling the braid edges outward for a fuller shape, while a few face-framing strands keep the look relaxed rather than overly structured.
6) French Twist

I gather my long hair at the nape, twist it upward, and tuck the ends into the roll. A few pins along the seam keep the style secure, while a clean side part gives it a polished shape. I smooth the surface with a small amount of styling cream to control flyaways without making the hair look stiff.
I prefer this updo for formal events, work settings, or days when I want my length contained. Leaving a few fine strands around my face creates a softer finish, while a neat twist looks more structured. I use crossed bobby pins for extra hold, especially when my hair feels heavy.
7) Rope Braid Ponytail

I start by gathering my long hair into a mid-height or low ponytail and securing it with an elastic. I divide the ponytail into two equal sections, twist each section in the same direction, then wrap them around each other in the opposite direction.
I secure the end with a second elastic and gently loosen the twists for a fuller texture. I smooth flyaways with a small amount of styling cream, while leaving the braid slightly relaxed so it keeps its rope-like shape.
8) Bubble Braid

I create this playful style by securing a low or mid-height ponytail, then adding small elastics every few inches. I gently pull each section outward to form rounded bubbles, adjusting their size for a neat, balanced shape.
I prefer clear elastics for a subtle finish, though colored bands can add contrast. Smoothing cream helps control flyaways, while a light mist of hairspray keeps the bubbles defined without making the hair stiff.
For a softer look, I leave a few face-framing strands loose and slightly vary the bubble sizes. I use this style on straight or wavy hair, and I can add texture with a curling iron before tying the ponytail.
9) Boho Braided Updo

I create this relaxed updo by braiding two side sections and gathering them with the remaining hair at the back. I twist or loosely coil the lengths into a low bun, then secure the shape with bobby pins.
I leave a few face-framing strands loose to keep the style soft rather than polished. A center part emphasizes symmetry, while a slightly uneven part gives the braid more casual character.
I add texture with a light wave before styling, especially when my hair feels too smooth to hold the braids. A flexible-hold spray helps preserve the shape without making the finished updo stiff.
10) Long Hair Top Knot
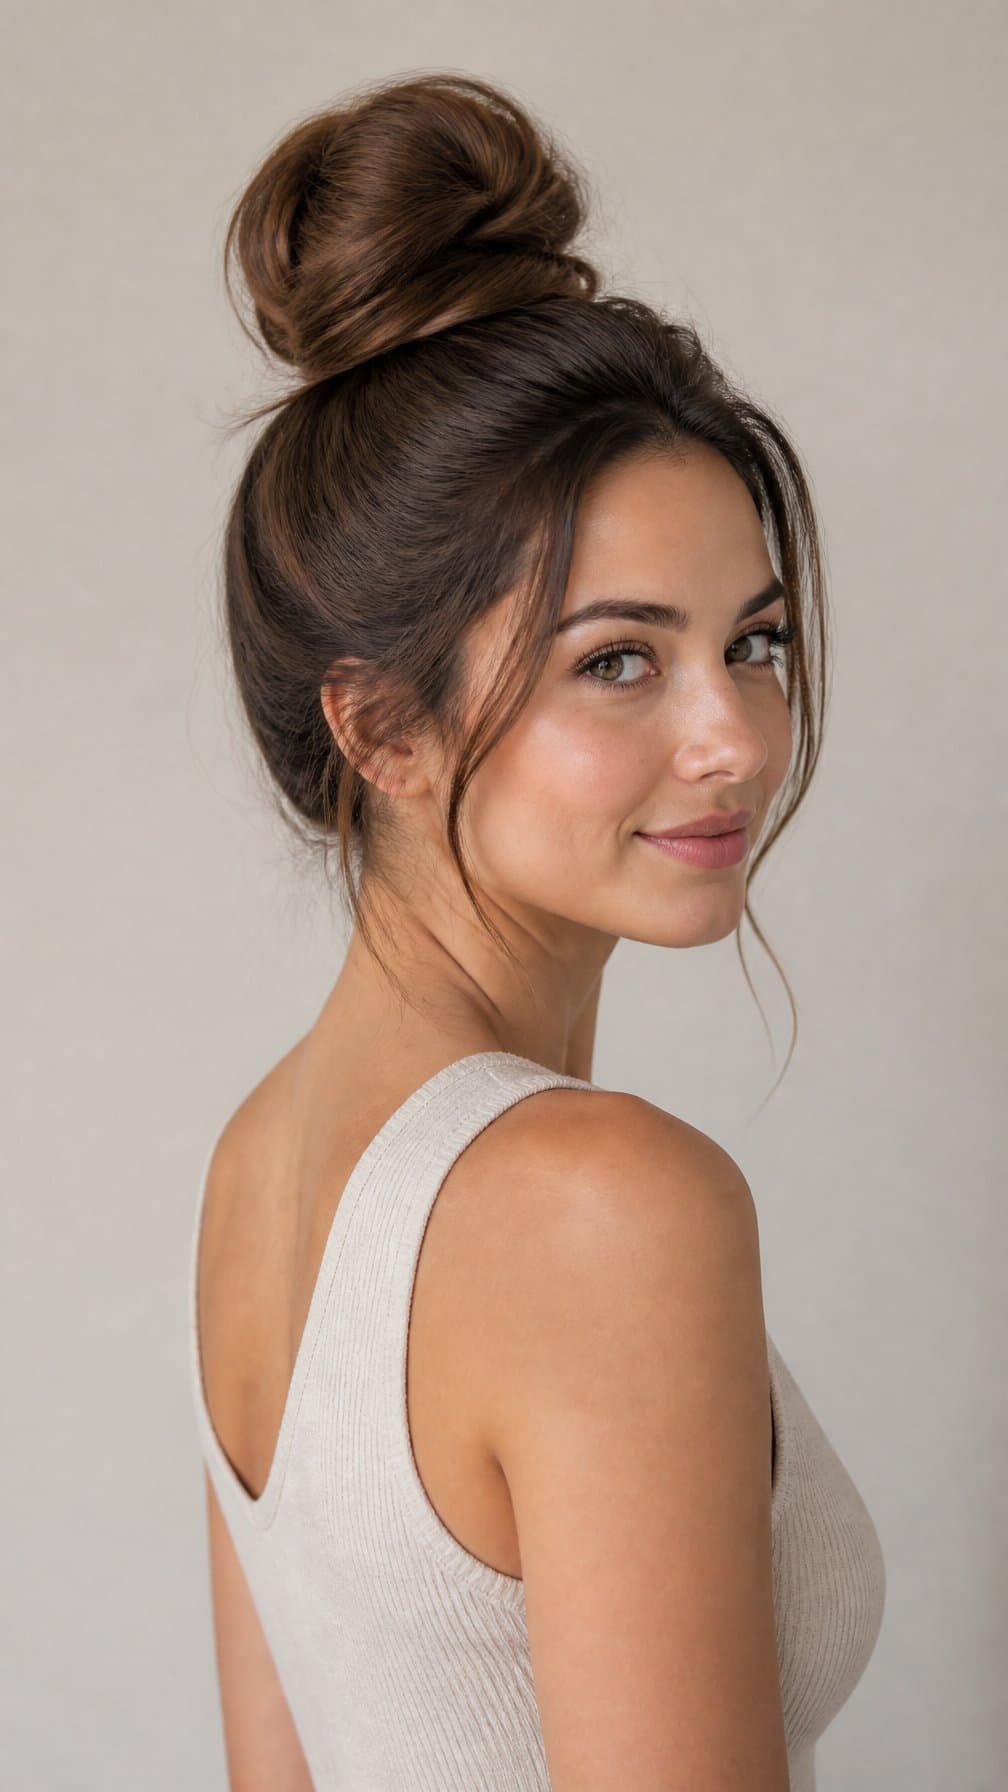
I gather my long hair high on my crown and twist it into a compact bun, keeping the shape polished and secure. This style lifts the hair away from my face while showing off its length and texture.
I smooth the sides with a brush or leave a few strands loose for a softer finish. A spiral hair tie and several pins help hold the knot without creating excessive tension.
For a casual version, I pull gently at the bun to add volume and let the ends peek through. I prefer this option for second-day hair because natural texture gives the knot more grip.
11) Half-Up Space Buns

I divide the upper section of my long hair at the crown and secure each side into a small bun, leaving the lower lengths loose. This placement keeps the style playful while showing off my hair’s length.
I smooth each section with a brush before twisting it around its base, then secure the bun with pins or small elastics. I leave a few face-framing strands loose for a softer finish, or keep the front sleek for a sharper look.
I use dry shampoo or light texturizing spray when my hair needs extra grip. For a polished result, I match both buns in size; for a relaxed style, I let their shapes vary slightly.
12) Sleek Low Bun

I create this polished style by gathering long hair at the nape and smoothing it with a fine-tooth comb. I secure the length into a tight twist, then pin the ends underneath for a clean, compact finish.
A small amount of styling cream or gel controls flyaways without making the hair look stiff. I prefer a center part for a precise appearance, while a deep side part adds structure and subtle asymmetry.
This bun works well for formal events, professional settings, or days when I want my length contained. I finish with light-hold hairspray and a few discreet pins to keep the shape secure.
13) Four-Strand Braid

I divide my long hair into four equal sections, then weave the outer strands across the inner ones in a repeating pattern. This braid creates more visual texture than a standard three-strand style while keeping the length neatly contained.
I begin with smooth, detangled hair and secure the finished braid with a small elastic. A light styling cream helps control flyaways without making the sections slippery, and I gently loosen the edges when I want a softer shape. The style works well down my back or gathered into a low bun.
14) Pull-Through Braid

I create this braid by securing several small ponytails down the back of my head, then splitting and looping each one around the next. The stacked sections produce a full, woven effect without the tension of a traditional braid.
I find this style works best on long, lightly textured hair. I gently tug each loop outward to add volume, while keeping the elastic bands aligned for a neat finish. A few face-framing pieces can soften the look.
I use clear elastics for a subtle appearance or colored ones for added contrast. This style holds well for casual days, but I secure the ends with pins when I need extra stability.
15) Milkmaid Braids

I divide my long hair into two equal sections and braid each side from the nape toward the ends. After securing both braids, I lift them over my head and pin them near the opposite ear, creating a balanced crown-like style.
I keep the finish neat by smoothing loose strands with a small amount of styling cream. For a softer look, I gently loosen the braid edges and leave a few face-framing pieces free. The style works well on straight, wavy, or lightly textured hair.
16) Twisted Half-Updo

I create this style by taking two sections from the front, twisting them away from my face, and securing them at the back with pins or a small elastic. The remaining length stays loose, allowing the twists to frame my features without fully pulling my hair up.
I prefer this look on textured or softly waved hair because the twists appear fuller and hold their shape. For straight hair, I add gentle waves first or lightly backcomb the crown for grip. A few loose strands can soften the finish, while smoothing cream keeps flyaways controlled.
17) Cascading Curls

I create cascading curls by dividing long hair into manageable sections and curling each one away from my face. After the curls cool, I loosen them gently with my fingers to keep the shape soft without flattening the volume.
I leave the ends slightly relaxed for a natural finish, then add a light mist of flexible-hold spray. This style works well with a center or side part, depending on how I want the curls to frame my features.
For extra detail, I pin back one side with a discreet clip or a small barrette. I keep heavier products away from the roots so the curls stay buoyant and move freely.
18) Hollywood Waves

I shape long hair into smooth, defined waves that curve away from the face and settle over one shoulder. I create a deep side part, then use a large-barrel curling iron to form consistent sections. After the hair cools, I brush through the curls gently to blend them into a polished pattern.
I finish with a light-hold spray and smooth the surface with a small amount of serum. I keep the ends aligned rather than tousled, which gives this style its formal, red-carpet appearance. For extra control, I pin each wave briefly while it cools.
19) Beachy Waves with Braided Detail

I create loose, uneven waves with a curling wand or overnight braids, leaving the ends slightly straighter for a relaxed finish. Then I take a small section above one ear, braid it toward the back, and secure it beneath the opposite side with a discreet pin.
I keep the braid narrow so it adds texture without overpowering the waves. A light texturizing spray helps separate the strands, while a small amount of smoothing cream controls flyaways and keeps the style touchable.
20) Voluminous Blowout

I create this look by applying heat protectant and volumizing mousse to damp hair, then rough-drying the roots until they are mostly dry. I divide the hair into sections and use a round brush to lift each section while directing airflow from roots to ends.
I focus on the crown and front layers, where extra lift makes the style look fuller. After the hair cools, I loosen the shape with my fingers and smooth the ends with a small amount of lightweight serum.
I finish with flexible-hold hairspray to maintain movement without making the hair stiff. This style works especially well on long layers, which help the blowout curve naturally around the face and shoulders.
21) Claw-Clip French Twist

I gather my long hair at the nape, twist it upward, and tuck the ends into the fold. A claw clip secures the center while leaving the shape relaxed rather than tightly pinned. I pull out a few face-framing strands to soften the finish.
I prefer a medium or large clip with firm teeth, especially when my hair is thick or layered. For finer hair, I twist more tightly and place the clip vertically along the seam. A light mist of texturizing spray adds grip without making the style stiff.
22) Scarf-Wrapped Bun

I gather my long hair into a low or mid-height bun, securing it with pins before adding a lightweight scarf. I wrap the scarf around the bun’s base and tie it at the side or underneath, depending on the finish I want. A square scarf creates a fuller effect, while a narrow scarf gives the style a cleaner line.
I keep the bun slightly relaxed so the fabric does not flatten it. For a polished look, I smooth my hair before pinning; for a casual version, I leave a few face-framing strands loose. Satin or silk scarves reduce friction and add a subtle sheen.
23) Braided Headband Hairstyle

I create this look by braiding a section of hair from behind one ear and draping it across the crown. I secure the braid behind the opposite ear, then leave the remaining lengths loose or add soft waves.
I prefer a slightly relaxed braid because it frames my face without looking overly structured. A small amount of texturizing spray helps the braid hold, while discreet pins keep the ends in place beneath the surrounding hair.
24) Double Dutch Braids

I divide my long hair down the center and create two Dutch braids, crossing each strand under the middle section while adding hair as I work. This technique keeps the braids raised and defined rather than flat against the head.
I secure the ends with small elastics and gently loosen the outer loops for a fuller shape. I leave the tails loose for a casual style or wrap them into low buns when I want a neater finish.
For better control, I start with smooth, detangled hair and keep each added section similar in size. A light styling cream helps reduce flyaways without making the braids stiff.


