Ulzzang makeup emphasizes fresh-looking skin, softly defined features, and balanced color. You can adapt the style to create a polished look that feels light, natural, and comfortable rather than heavily layered.

Save for later
Want to come back to this story? Save it with your email so it is easy to find again.
You can achieve a soft, glassy finish by combining a sheer, hydrated base with gentle color on the cheeks, eyes, and lips. I’ll guide you through varied ways to shape this aesthetic, from barely-there makeup to more defined evening styles, while keeping each look cohesive and wearable.
Table of Contents
- 1 1) Dewy Glass-Skin Base with Sheer Cushion Foundation
- 2 2) Rosy-Cheek Ulzzang Look with Cream Blush
- 3 3) Straight Brows and Soft Taupe Shadow
- 4 4) Peach Monochrome Ulzzang Makeup
- 5 5) Glowy Under-Eye Aegyo-Sal Look
- 6 6) Soft Coral Gradient Lips
- 7 7) Pink Blush Draping for a Youthful Finish
- 8 8) Natural Brown Circle-Lens Makeup
- 9 9) Champagne Inner-Corner Highlight
- 10 10) Barely-There Makeup with Clear Gloss
- 11 11) K-Beauty No-Makeup Makeup Look
- 12 12) Soft Mauve Ulzzang Evening Look
- 13 13) Pastel Pink Eye Makeup with Glassy Skin
- 14 14) Straight Brows with Blurred Lip Tint
- 15 15) Dewy Peach Makeup for Warm Undertones
- 16 16) Cool-Toned Rose Ulzzang Look
- 17 17) Subtle Winged Liner with Glossy Base
- 18 18) Cream Highlighter for Reflective Cheekbones
- 19 19) Soft Brown Smoky Ulzzang Makeup
- 20 20) Glossy Cherry Gradient Lips
- 21 21) Lavender Blush with Sheer Base
- 22 22) Natural Freckles and Dewy Makeup
- 23 Core Techniques for a Glass-Skin Base
- 24 Skin Preparation and Hydrating Layers
- 25 Sheer Complexion Products and Strategic Concealing
- 26 Soft Blush and Subtle Highlight Placement
- 27 Finishing Touches for a Balanced Ulzzang Style
- 28 Straight Brows and Defined Lashes
- 29 Gradient Lips With Glossy Color
- 30 Setting Makeup Without Dulling Radiance
1) Dewy Glass-Skin Base with Sheer Cushion Foundation

I start with a well-moisturized face, concentrating on dry areas around my cheeks and nose. I apply a thin layer of sheer cushion foundation from the center of my face outward, keeping my natural skin texture visible.
I press the cushion into my skin rather than rubbing it, which helps create an even, fresh finish. I add a small amount only where I need more coverage, then tap a luminous concealer under my eyes and around redness.
I leave the high points of my face lightly dewy and set only my forehead, sides of my nose, and chin with a fine translucent powder. A mist of hydrating setting spray helps the layers blend without making the base look heavy.
2) Rosy-Cheek Ulzzang Look with Cream Blush

I apply a soft pink cream blush to the highest points of my cheeks, then blend it outward with my fingertips. The creamy texture leaves a fresh finish that works well with light, dewy base makeup.
I keep the color close to the center of my face instead of extending it toward my temples. A small amount across the bridge of my nose adds gentle warmth, while a thin layer of translucent powder around my nose and forehead controls shine without dulling the cheeks.
For balance, I use muted brown shadow along my upper lash line and curl my lashes before applying a lengthening mascara. I finish with a sheer rosy tint on my lips, keeping the edges softly blurred rather than sharply defined.
3) Straight Brows and Soft Taupe Shadow

I shape my brows with a mostly straight line and a gentle taper at the tail, keeping the front softly filled rather than sharply outlined. I brush the hairs upward, then set them with clear gel for a neat, natural finish.
I sweep a matte taupe shadow across the lids and blend it slightly above the crease to add quiet definition. I keep the outer corners softly diffused and avoid heavy contouring, which preserves the clean, open look.
I finish with a thin brown lash line, curled lashes, and a small amount of lengthening mascara. A touch of pale shimmer at the inner corners adds brightness without taking attention from the smooth taupe base.
4) Peach Monochrome Ulzzang Makeup

I keep the palette within soft peach tones, using a light base that leaves the skin looking fresh and even. I sweep peach shadow across the lids, blend a slightly deeper shade along the crease, and add a thin brown liner to define the eyes without making them look heavy.
I place a muted peach blush high on the cheeks and blend it toward the temples for a seamless finish. A glossy peach tint completes the look, while a small amount of clear balm on the cheekbones adds a smooth, glassy reflection.
5) Glowy Under-Eye Aegyo-Sal Look

I brighten the under-eye area with a thin layer of lightweight concealer, keeping coverage focused near the inner corners and dark shadows. A small amount of luminous powder or cream highlighter along the natural under-eye puff adds a soft, glassy effect without making the skin look heavy.
I define the lower edge of the aegyo-sal with a muted taupe or beige-brown shadow. I keep the line short and blend it thoroughly so it resembles a natural crease rather than obvious contour. A touch of peach or pink tint on the center adds freshness.
I finish with curled lower lashes and a narrow line of mascara, concentrating product near the roots. I avoid thick eyeliner beneath the eyes, which can reduce the bright, rounded appearance. To keep the finish smooth, I use minimal powder and press away excess shine only where creasing occurs.
6) Soft Coral Gradient Lips

I start with a thin layer of lip balm, then soften the edges with a small amount of concealer. I apply coral tint to the center of my lips and blend it outward with my fingertip, leaving the outer edges lighter.
For a glassy finish, I add clear or lightly tinted gloss only to the center. This keeps the gradient visible while giving my lips a smooth, hydrated look. I choose a warm coral shade that complements my blush without matching it too closely.
7) Pink Blush Draping for a Youthful Finish

I sweep a soft pink blush from the apples of my cheeks toward my temples, keeping the color sheer and well blended. This draping technique adds gentle lift while preserving the smooth, youthful quality associated with ulzzang makeup.
I choose a satin or softly luminous formula rather than heavy glitter. After placing most of the pigment high on my cheeks, I blend the edges with a clean brush and tap a small amount across my nose for a natural flush.
I balance the blush with muted eye makeup and a glossy lip tint. When I need more definition, I layer thin amounts instead of applying one dense patch, which keeps the finish fresh and even.
8) Natural Brown Circle-Lens Makeup

I choose warm brown circle lenses to add gentle definition without making my eyes look overly dramatic. I keep the base thin and dewy, then apply beige-brown shadow across the lids and deepen the outer corners with a soft cocoa shade. A narrow brown liner follows my upper lash line.
I curl my lashes and use lengthening mascara mainly on the outer lashes, keeping the finish light and separated. I add muted peach blush high on my cheeks and tap a clear or pink-beige gloss onto the center of my lips. Brushed brows and a small highlight at the inner corners complete the soft, glassy effect.
9) Champagne Inner-Corner Highlight

I place a small amount of champagne shimmer at the inner corners after finishing my base eye makeup. The warm, pale tone brightens the eye area without creating a stark contrast, which suits a soft Ulzzang-inspired look.
I use a fine brush or my fingertip to keep the placement precise, then blend the edges lightly toward the lower inner lash line. I prefer a finely milled formula with a satin or subtle metallic finish, since chunky glitter can distract from the glassy effect.
When I want more definition, I pair the highlight with a thin brown liner and softly curled lashes. I keep the rest of the eye makeup muted so the inner-corner detail remains clean and balanced.
10) Barely-There Makeup with Clear Gloss

I keep the base sheer, using a small amount of skin tint only where I need evening out. I soften the cheeks with a muted cream blush, then brush my brows upward without creating sharp lines. This keeps my complexion fresh while preserving natural texture.
I prefer a neutral beige wash on the lids and a thin brown line close to the upper lashes. After curling my lashes, I apply one light coat of mascara. I finish with clear gloss over moisturized lips, adding a smooth shine without changing their natural color.
11) K-Beauty No-Makeup Makeup Look

I start with a thin layer of moisturizing sunscreen, then apply a sheer skin tint only where I need light coverage. I tap a small amount of concealer beneath my eyes and around redness, keeping the natural skin texture visible.
I use a muted peach or rosy cream blush on the center of my cheeks and blend the edges with my fingers. For the eyes, I sweep a beige shadow across the lids, curl my lashes, and apply a light coat of brown mascara.
I brush my brows upward and fill only sparse areas with fine, hairlike strokes. A clear brow gel keeps them soft rather than sharply defined.
I finish with a tinted balm in a natural pink shade, adding a small amount of gloss to the center of my lips. This keeps the look fresh, balanced, and subtly glassy without appearing heavily made up.
12) Soft Mauve Ulzzang Evening Look

I use muted mauve eyeshadow to create a soft evening look with gentle definition. I sweep a dusty mauve shade across the lids, then deepen the outer corners with a cool plum tone. A light shimmer on the center of each lid adds dimension without making the finish appear heavy.
I keep the eyeliner thin and slightly extended at the outer corners. I curl my lashes and apply lengthening mascara, focusing on separation rather than volume. Soft taupe shading beneath the lower lash line balances the eye makeup and maintains a clean, rounded shape.
For the complexion, I use a medium-coverage base with a satin finish and add a small amount of glow to the cheekbones. I finish with muted rose-mauve blush and a blurred mauve lip tint, concentrating the color toward the center for a softly diffused effect.
13) Pastel Pink Eye Makeup with Glassy Skin

I sweep a soft pastel pink shadow across my lids, keeping the color sheer near the crease and slightly brighter at the center. A thin brown liner defines my upper lash line without overpowering the delicate tone, while curled lashes and lengthening mascara open up my eyes.
I prep my skin with lightweight hydration, then apply a thin layer of luminous base only where I need coverage. I tap liquid highlighter onto my cheekbones, nose bridge, and inner corners, leaving the finish fresh rather than glittery.
I complete the look with pink cream blush placed high on my cheeks and a glossy rose-tinted lip balm. I keep my brows softly brushed upward, using minimal pencil to preserve the clean, youthful balance.
14) Straight Brows with Blurred Lip Tint

I shape my brows with a soft, mostly straight line and keep the arch subtle. I fill sparse areas with short strokes, then brush the hairs upward and outward so the edges remain natural rather than sharply defined.
For the lips, I apply a muted tint to the center and blend it toward the edges with my fingertip. A thin layer of balm over the color softens the gradient and adds a smooth, hydrated finish without making the lips look heavily lined.
I keep the rest of the makeup light, using a sheer base, softly curled lashes, and a small amount of blush close to the center of the cheeks. This balance lets the clean brow shape and diffused lip color define the look.
15) Dewy Peach Makeup for Warm Undertones

I start with a thin, hydrating base that lets my natural skin texture remain visible. I blend peach-toned cream blush across my cheeks and slightly over the nose, creating warmth without a heavy stripe of color.
For my eyes, I use soft apricot or champagne shadow with a subtle sheen. I keep the liner brown and close to the lash line, then apply a light coat of mascara so the look stays airy and balanced.
I finish with a peachy nude tint on my lips, adding clear balm to the center for a glassy effect. A small amount of liquid highlighter on my cheekbones and inner corners catches light without making my skin look metallic.
16) Cool-Toned Rose Ulzzang Look

I create this look with muted rose and mauve tones that give my complexion a soft, cool finish. I press a sheer rose shadow across my lids, then add a slightly deeper shade along the outer corners and lower lash lines for gentle definition.
I keep my base thin and luminous, using concealer only where I need extra coverage. A cool pink blush placed high on my cheeks adds a fresh flush, while a subtle pearl highlight on the inner corners brightens my eyes without looking glittery.
For the lips, I apply a rosy mauve tint toward the center and blend it outward. I finish with a clear or pink-toned gloss, keeping the edges soft to maintain the glassy, understated effect.
17) Subtle Winged Liner with Glossy Base

I start with a thin layer of lightweight, luminous foundation and add concealer only where I need extra coverage. A small amount of clear or lightly tinted gloss on the high points of my cheeks gives my skin a smooth, glass-like reflection without looking greasy.
I keep the eye makeup precise by drawing a narrow line along my upper lashes, extending the outer corner into a short, slightly lifted wing. Brown or soft black liner creates a gentler effect than intense liquid black. I finish with curled lashes and one coat of lengthening mascara.
For balance, I brush my brows upward and use a muted pink or peach tint on my lips and cheeks. I set the center of my face with a fine layer of translucent powder, leaving the cheekbones and eyelids fresh.
18) Cream Highlighter for Reflective Cheekbones
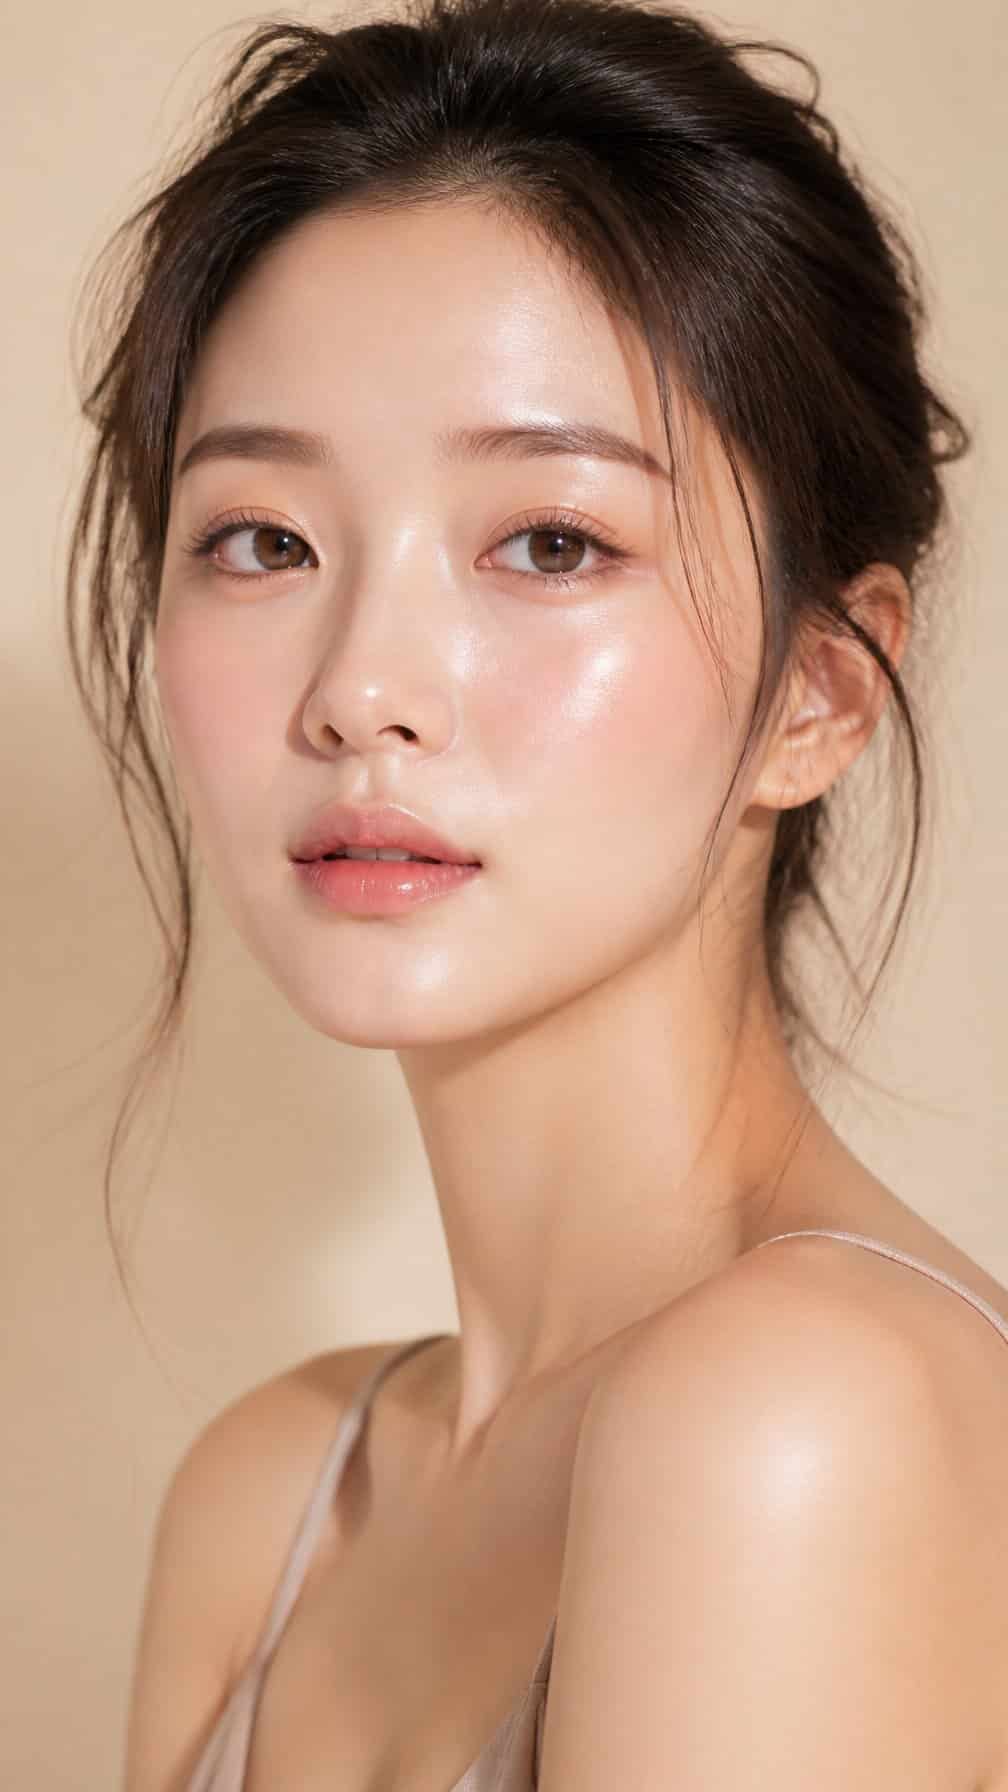
I use a small amount of cream highlighter on the highest point of my cheekbones, then blend the edges with my fingertip. The warmth of my skin helps melt the formula, creating a smooth, glassy reflection without a visible stripe.
I keep the finish controlled by placing product above the blush rather than across the entire cheek. For a soft ulzzang effect, I choose a sheer pearl or champagne tone that complements my undertone and remains natural in direct light.
I tap on a second layer only where I want extra dimension, such as the outer cheekbone or the bridge of my nose. I avoid rubbing, which can disturb the base underneath and make the complexion look uneven.
19) Soft Brown Smoky Ulzzang Makeup

I create this look with matte beige shadow across my lids, then blend a soft brown shade through the crease and outer corner. I keep the edges diffused rather than sharply defined, which gives the eyes gentle depth without making them appear heavy.
I line my upper lash line with dark brown pencil and extend it slightly past the outer corner. A thin coat of mascara lifts my lashes while preserving the relaxed effect. I add a muted peach blush and a sheer beige-pink lip tint to balance the warm eye makeup.
For the glassy finish, I apply a small amount of clear balm to my cheekbones and the center of my eyelids. I avoid placing it over textured areas, so the skin looks fresh while the smoky colors remain soft and controlled.
20) Glossy Cherry Gradient Lips

I start by smoothing my lips with a thin layer of balm, then remove excess shine with tissue. I tap a cherry-toned tint onto the center of my upper and lower lips, keeping the color strongest near the inner lip.
I blend the edges outward with my fingertip or a small brush, leaving the border softly diffused rather than sharply lined. I add a clear or lightly tinted gloss only to the center, which keeps the gradient visible while creating a glassy finish.
I choose a cool cherry shade for a crisp look or a warmer berry tone for softer contrast. To keep the color fresh, I press my lips together gently instead of dragging the gloss across the blended tint.
21) Lavender Blush with Sheer Base

I start with a thin, dewy base that lets my natural skin texture remain visible. I tap lavender blush onto the upper cheeks, building the color gradually so it looks soft rather than opaque.
I keep the eyes simple with a pale beige wash, curled lashes, and a muted mauve tint on my lips. A small amount of highlighter on the cheekbones adds a glassy finish without overpowering the cool blush.
I blend the blush slightly toward the temples to create a lifted shape. I finish with a fine mist of setting spray, focusing on a fresh, moisturized appearance instead of heavy coverage.
22) Natural Freckles and Dewy Makeup

I keep the base sheer so my natural skin texture remains visible. I tap a lightweight skin tint over redness, then add a small amount of concealer only where needed. A hydrating primer and fine facial mist help create a fresh, glassy surface without making my skin look oily.
I place faux freckles across my nose and upper cheeks with a brown freckle pen, varying the size and spacing for a natural pattern. I soften a few dots with my fingertip before they dry, which keeps the finish subtle rather than stamped on.
I finish with peach cream blush, brushed brows, curled lashes, and a clear balm on my lips. I press liquid highlighter onto the high points of my cheeks instead of sweeping it across the whole face, preserving the soft ulzzang effect.
Core Techniques for a Glass-Skin Base

I build this look with thin hydration layers, light coverage, and controlled shine. I keep texture visible but even, then place color and reflection where they naturally catch light.
Skin Preparation and Hydrating Layers
I start with a gentle cleanse and pat my skin dry, leaving it slightly damp. I apply a hydrating toner or essence in one or two thin layers, pressing each layer in instead of rubbing it across the surface.
Next, I use a lightweight serum with ingredients such as glycerin, panthenol, or hyaluronic acid. I seal it with a small amount of moisturizer, concentrating on the cheeks and avoiding excess product around the nose and eyelids.
I wait a few minutes before makeup. If my skin still feels tight, I add moisturizer; if it feels slippery, I remove excess with a clean tissue. This prevents pilling and keeps the base smooth rather than greasy.
Sheer Complexion Products and Strategic Concealing
I choose a sheer, flexible skin tint or mix a small amount of foundation with moisturizer. I apply it from the center of my face outward, using a damp sponge or thin synthetic brush to keep the layer nearly transparent along the jaw and hairline.
I conceal only visible redness, dark circles, and individual blemishes. A small pointed brush gives me better control than applying a full layer of concealer, and I tap the edges until they blend into the surrounding skin.
I leave freckles and natural texture visible when possible. I set only areas that crease or become oily, such as the sides of my nose, under-eyes, and center of the forehead, using a finely milled powder and a small fluffy brush.
Soft Blush and Subtle Highlight Placement
I use a muted pink, peach, or apricot blush with a cream or balm texture. I tap it onto the upper apples of my cheeks and blend toward the temples, keeping the color translucent so the skin still looks hydrated beneath it.
For a softer ulzzang effect, I add a small amount across the nose bridge or just above its tip. I avoid placing heavy color low on the cheeks because it can make the complexion look flat or overly sculpted.
I apply highlight only to the high points that naturally reflect light: the tops of my cheekbones, the bridge of my nose, and the inner corners of my eyes. I choose a pearly, finely milled formula without visible glitter and press it on with my fingertip.
Finishing Touches for a Balanced Ulzzang Style

I keep the final details soft but deliberate: straight brows frame the eyes, blended lips add fresh color, and a lightweight setting method preserves a glassy finish. Small adjustments in line, texture, and shine help the makeup look polished without appearing heavy.
Straight Brows and Defined Lashes
I shape my brows with a mostly straight lower line and only a slight lift near the tail. I fill sparse areas with fine, hairlike strokes using a taupe or soft brown pencil, then brush the hairs upward and outward with clear or tinted gel. I avoid a sharp arch and heavy block color, since both can make the expression look harder.
For the eyes, I curl my lashes from base to tip and apply a lengthening mascara in thin layers. I focus extra product at the outer lashes while keeping the lower lashes light. A narrow brown liner along the upper lash roots adds definition without overpowering the clean brow shape.
Gradient Lips With Glossy Color
I apply a muted rose, peach, or berry tint to the center of my lips, then soften the edges with a fingertip or small brush. Concealer is optional around the outer lip line, but I use only a thin layer so the gradient does not look sharply outlined. Blotting once removes excess pigment while leaving a natural stain.
I place clear or lightly tinted gloss mainly across the center of the upper and lower lips. This concentrates shine where the lips naturally catch light and prevents the color from spreading beyond the edges. When my lips feel dry, I use balm first, wait briefly, and remove excess before applying tint.
Setting Makeup Without Dulling Radiance
I set only the areas that crease or become oily, such as the sides of my nose, inner cheeks, forehead, and chin. A small fluffy brush gives me more control than pressing powder across the entire face. I choose a finely milled translucent powder and apply it in a thin layer over concealer.
I leave the cheekbones and upper bridge of the nose mostly untouched so the skin retains controlled luminosity. If I need more hold, I mist a setting spray from arm’s length and let it dry without rubbing. I blot midday shine with tissue or a thin blotting sheet before adding any powder.